Secure AWS Access for Self-Managed Kubernetes: Implementing IRSA Without EKS
If you’re running self-managed Kubernetes clusters (like Talos, kubeadm, k3s, or RKE2) on AWS, you’ve likely faced a critical security challenge: How do you give your pods secure access to AWS services without embedding long-lived credentials?
The traditional approaches all have significant drawbacks:
- Embedding IAM access keys in pods → Security nightmare (credentials can leak, no automatic rotation)
- Using EC2 instance profiles → Too coarse-grained (all pods on a node get the same permissions)
- Building custom OIDC solutions → Complex, error-prone, and time-consuming
Amazon EKS solves this elegantly with IAM Roles for Service Accounts (IRSA), but what if you’re not using EKS?
I built terraform-aws-kubernetes-irsa to solve exactly this problem. It’s a production-ready Terraform module that enables EKS-style IRSA on any self-managed Kubernetes cluster running on AWS.
The Problem: IAM Access for Self-Managed Clusters
Let’s start with why this matters. Consider a common scenario: You have a pod that needs to:
- Upload files to S3
- Send messages to SQS
- Query DynamoDB
- Invoke Lambda functions
The Traditional (Bad) Approach
apiVersion: v1
kind: Secret
metadata:
  name: aws-credentials
type: Opaque
data:
  AWS_ACCESS_KEY_ID: <base64-encoded-key>
  AWS_SECRET_ACCESS_KEY: <base64-encoded-secret>
Problems with this approach:
- ❌ Long-lived credentials that never rotate
- ❌ Credentials stored in etcd (even if encrypted)
- ❌ Risk of accidental exposure in logs, git repos, or container images
- ❌ No audit trail of which pod used which credentials
- ❌ Difficult to implement least-privilege access
The EKS Solution: IRSA
EKS provides IRSA, which uses OpenID Connect (OIDC) to let pods assume IAM roles using short-lived tokens:
- ✅ No long-lived credentials
- ✅ Automatic token rotation (every 15 minutes)
- ✅ Fine-grained IAM policies per service account
- ✅ Full CloudTrail audit logging
- ✅ Principle of least privilege
The catch? This only works on EKS.
The Solution: IRSA for Any Kubernetes Cluster
My Terraform module brings EKS-style IRSA to self-managed clusters by implementing the exact same OIDC mechanism that EKS uses, but for clusters you manage yourself.
Key Features
🔐 Secure by Design
- Uses S3 and CloudFront with Origin Access Control (OAC) to host OIDC discovery documents securely
- TLS certificates managed by AWS Certificate Manager
- Zero long-lived keys in your cluster
🌍 Universal Support
- Works with Talos, RKE2, k3s, kubeadm, and any conformant Kubernetes cluster
- No modifications to your cluster required (beyond API server flags)
⚡ Automated Injection
- Optional Pod Identity Webhook for automatic credential injection
- EKS-compatible environment variable injection
- No manual pod configuration needed
🔄 Production-Ready
- Fully automated via Terraform
- Supports custom domains and DNS
- Configurable caching and performance tuning
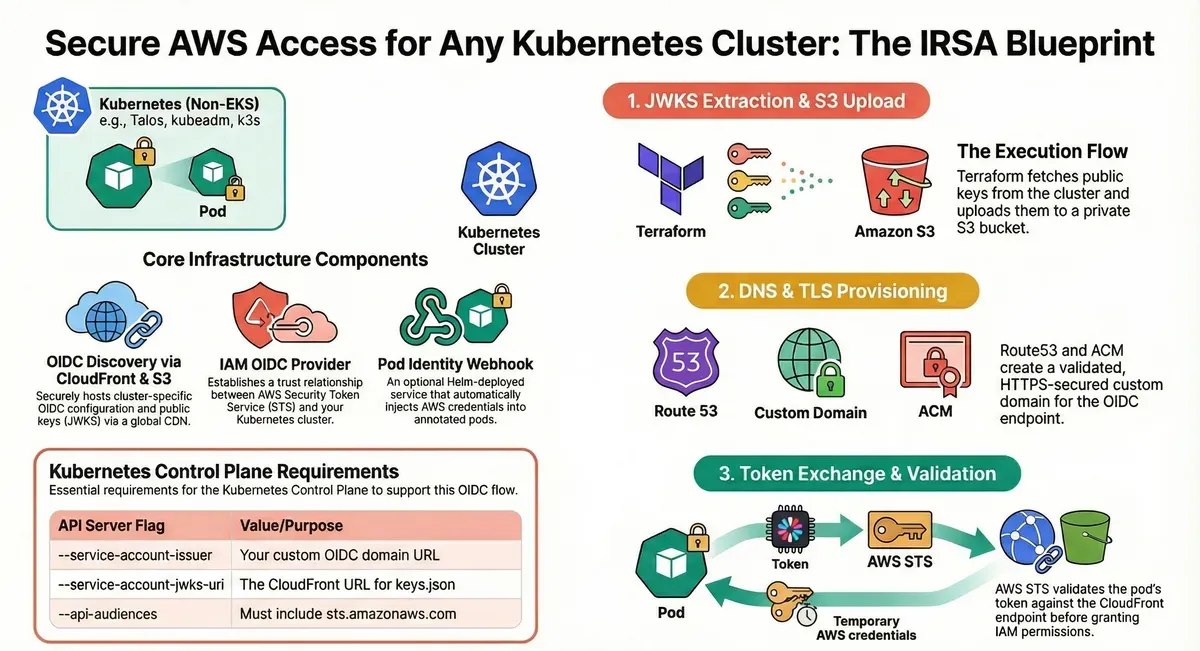
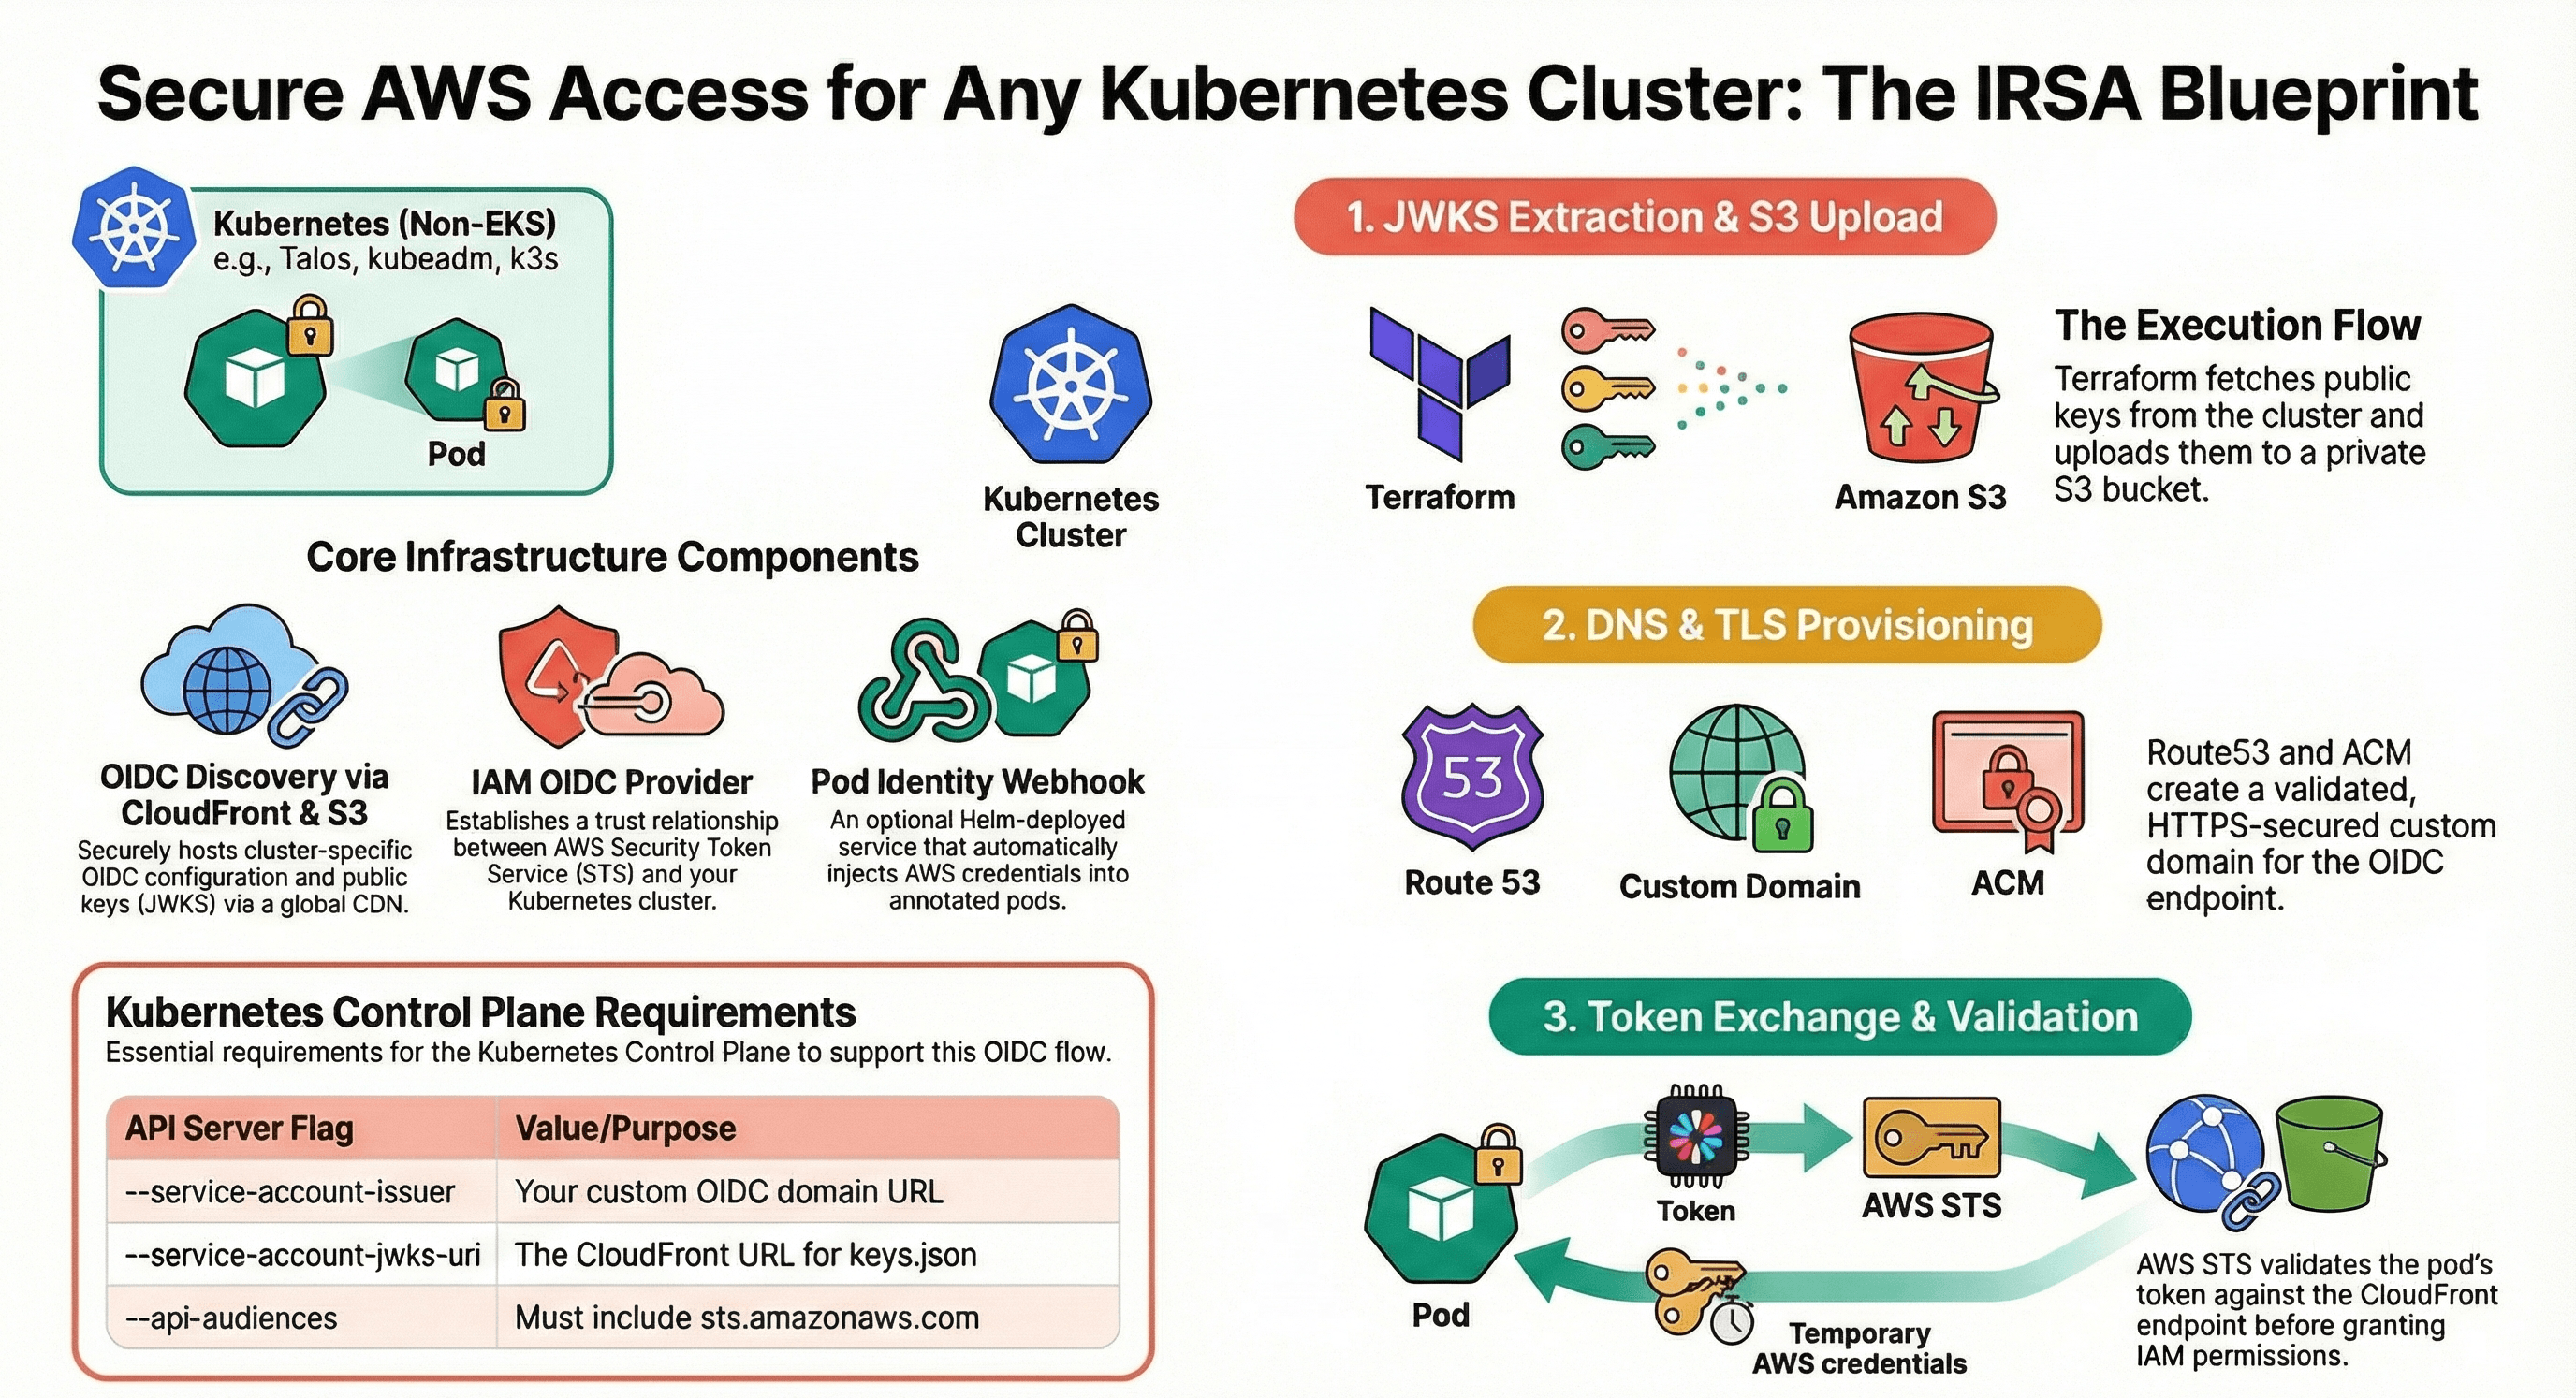
How It Works: The Architecture
The module implements a three-phase execution flow:
Phase 1: JWKS Extraction & S3 Upload
# Terraform fetches your cluster's public keys
data "external" "jwks" {
  program = ["bash", "-c", "kubectl --kubeconfig=${var.kubeconfig_path} get --raw /openid/v1/jwks | jq -c '{jwks: .}'"]
}
What happens:
- Terraform executes
kubectl get --raw /openid/v1/jwksto retrieve your cluster’s JSON Web Key Set (JWKS) - The OIDC discovery document and JWKS are uploaded to a private S3 bucket
- S3 bucket policy ensures only CloudFront can access the files (via OAC with SigV4 signing)
Phase 2: DNS & TLS Provisioning
CloudFront Distribution:
- Serves OIDC documents over HTTPS with global caching
- Custom domain (e.g.,
my-cluster-oidc.example.com) - ACM-managed TLS certificate with automatic DNS validation
Why CloudFront?
- AWS STS requires OIDC documents to be served over HTTPS with valid TLS certificates
- CloudFront provides high availability and low latency globally
- No need to manage web servers or certificates manually
Route53 Integration:
- Automatically creates DNS records pointing to CloudFront distribution
- Validates ACM certificates via DNS
Phase 3: Token Exchange & Validation
This is where the magic happens:
-
Pod requests AWS access:
# Pod reads projected service account token cat /var/run/secrets/eks.amazonaws.com/serviceaccount/token -
AWS SDK calls STS:
aws sts assume-role-with-web-identity \ --role-arn arn:aws:iam::123456789012:role/my-app-role \ --role-session-name my-pod \ --web-identity-token file:///var/run/secrets/eks.amazonaws.com/serviceaccount/token -
STS validates the token:
- Fetches OIDC discovery document from your custom domain
- Retrieves JWKS to verify token signature
- Validates token claims (issuer, audience, expiration)
- Returns temporary AWS credentials (valid for 1 hour)
-
Pod uses temporary credentials:
- AWS SDK automatically refreshes credentials before expiration
- All AWS API calls are audited in CloudTrail
Core Infrastructure Components
The module creates these AWS resources:
| Component | Technology | Purpose |
|---|---|---|
| Discovery Bucket | S3 (private) | Hosts OIDC configuration and JWKS files |
| CDN | CloudFront | Serves documents over HTTPS with caching |
| TLS Certificate | ACM (us-east-1) | Provides valid certificate for custom domain |
| DNS | Route53 | Maps OIDC domain to CloudFront distribution |
| Access Control | CloudFront OAC | Secures S3 access via SigV4 signing |
| Identity Provider | IAM OIDC Provider | Enables STS token validation |
| Pod Mutation | Pod Identity Webhook (Helm) | Automatically injects AWS credentials |
Implementation Guide
Prerequisites
1. Kubernetes Cluster Requirements
Your API server must be configured with these flags:
# API Server Configuration (e.g., in Talos machine config)
apiServer:
  extraArgs:
    service-account-issuer: https://my-cluster-oidc.example.com
    service-account-jwks-uri: https://my-cluster-oidc.example.com/openid/v1/jwks
    api-audiences: sts.amazonaws.com
Why these flags?
service-account-issuer: Must match your OIDC provider URL exactlyservice-account-jwks-uri: Tells the API server where to publish public keysapi-audiences: Must includests.amazonaws.comfor AWS STS validation
2. Local Machine Requirements
You need these tools available during terraform apply:
kubectl- To fetch JWKS from your clusterjq- To process JSON responsesbash- To execute the data source script
3. AWS Provider Configuration
You need two AWS provider instances (CloudFront requires certificates in us-east-1):
provider "aws" {
  region = "eu-west-1"  # Your primary region
}

provider "aws" {
  alias  = "us_east_1"
  region = "us-east-1"  # Required for CloudFront certificates
}
Step 1: Deploy the Module
Create a main.tf:
module "irsa" {
  source  = "KamranBiglari/kubernetes-irsa/aws"
  version = "1.0.0"  # Use the latest version

  providers = {
    aws           = aws
    aws.us_east_1 = aws.us_east_1
    helm          = helm
  }

  # Basic Configuration
  name               = "my-k8s-cluster"
  environment        = "production"
  oidc_domain        = "my-cluster-oidc.example.com"
  route53_zone_id    = "Z0123456789ABCDEF"
  kubeconfig_path    = "${path.module}/kubeconfig"
  aws_region         = "eu-west-1"

  # Pod Identity Webhook (optional but recommended)
  webhook_enabled = true

  # Performance Tuning (optional)
  cloudfront_price_class = "PriceClass_100"  # Use only NA/EU edge locations

  # Webhook Scheduling (optional)
  webhook_node_selector = {
    "node-role.kubernetes.io/control-plane" = ""
  }

  webhook_tolerations = [
    {
      key      = "node-role.kubernetes.io/control-plane"
      operator = "Exists"
      effect   = "NoSchedule"
    }
  ]
}

output "oidc_provider_arn" {
  value = module.irsa.oidc_provider_arn
}

output "issuer_url" {
  value = module.irsa.issuer_url
}
Apply the configuration:
terraform init
terraform plan
terraform apply
What gets created:
- S3 bucket with OIDC discovery documents
- CloudFront distribution with custom domain
- ACM certificate (auto-validated via DNS)
- Route53 DNS records
- IAM OIDC provider
- Pod Identity Webhook (if enabled)
Step 2: Create an IAM Role for Your Application
Create an IAM role that trusts your OIDC provider:
# Example: S3 access for a specific service account
resource "aws_iam_role" "my_app" {
  name = "my-app-s3-access"

  assume_role_policy = jsonencode({
    Version = "2012-10-17"
    Statement = [
      {
        Effect = "Allow"
        Principal = {
          Federated = module.irsa.oidc_provider_arn
        }
        Action = "sts:AssumeRoleWithWebIdentity"
        Condition = {
          StringEquals = {
            "${module.irsa.oidc_provider_url}:sub" = "system:serviceaccount:default:my-app"
            "${module.irsa.oidc_provider_url}:aud" = "sts.amazonaws.com"
          }
        }
      }
    ]
  })
}

resource "aws_iam_role_policy" "my_app_s3" {
  role = aws_iam_role.my_app.id

  policy = jsonencode({
    Version = "2012-10-17"
    Statement = [
      {
        Effect = "Allow"
        Action = [
          "s3:GetObject",
          "s3:PutObject",
          "s3:DeleteObject"
        ]
        Resource = "arn:aws:s3:::my-bucket/*"
      }
    ]
  })
}
Key Security Note: The StringEquals condition ensures that only pods using the my-app service account in the default namespace can assume this role.
Step 3: Create Kubernetes Service Account
apiVersion: v1
kind: ServiceAccount
metadata:
  name: my-app
  namespace: default
  annotations:
    eks.amazonaws.com/role-arn: arn:aws:iam::123456789012:role/my-app-s3-access
Important: The annotation key is eks.amazonaws.com/role-arn (same as EKS for compatibility with the Pod Identity Webhook).
Step 4: Deploy Your Application
apiVersion: apps/v1
kind: Deployment
metadata:
  name: my-app
  namespace: default
spec:
  replicas: 2
  selector:
    matchLabels:
      app: my-app
  template:
    metadata:
      labels:
        app: my-app
    spec:
      serviceAccountName: my-app  # Use the annotated service account
      containers:
      - name: app
        image: my-app:latest
        # No need to manually configure AWS credentials!
        # The Pod Identity Webhook automatically injects:
        # - AWS_ROLE_ARN
        # - AWS_WEB_IDENTITY_TOKEN_FILE
        # - AWS_DEFAULT_REGION
        env:
        - name: BUCKET_NAME
          value: my-bucket
That’s it! Your pod now has secure, temporary AWS access.
How the Pod Identity Webhook Works
When you deploy a pod with the annotated service account, the webhook mutates the pod spec automatically:
Before mutation:
spec:
  serviceAccountName: my-app
  containers:
  - name: app
    image: my-app:latest
After mutation (what actually runs):
spec:
  serviceAccountName: my-app
  containers:
  - name: app
    image: my-app:latest
    env:
    - name: AWS_ROLE_ARN
      value: arn:aws:iam::123456789012:role/my-app-s3-access
    - name: AWS_WEB_IDENTITY_TOKEN_FILE
      value: /var/run/secrets/eks.amazonaws.com/serviceaccount/token
    - name: AWS_DEFAULT_REGION
      value: eu-west-1
    volumeMounts:
    - name: aws-iam-token
      mountPath: /var/run/secrets/eks.amazonaws.com/serviceaccount
      readOnly: true
  volumes:
  - name: aws-iam-token
    projected:
      sources:
      - serviceAccountToken:
          audience: sts.amazonaws.com
          expirationSeconds: 86400
          path: token
The AWS SDK automatically detects these environment variables and handles token rotation transparently.
Advanced Configuration Options
Custom CloudFront Cache Settings
module "irsa" {
  # ... other configuration ...

  # Cache OIDC documents for 1 hour (default)
  default_cache_ttl = 3600
  max_cache_ttl     = 86400
  min_cache_ttl     = 0

  # Use only North America and Europe edge locations
  cloudfront_price_class = "PriceClass_100"
}
Webhook Scheduling on Control Plane Nodes
module "irsa" {
  # ... other configuration ...

  webhook_node_selector = {
    "node-role.kubernetes.io/control-plane" = ""
  }

  webhook_tolerations = [
    {
      key      = "node-role.kubernetes.io/control-plane"
      operator = "Exists"
      effect   = "NoSchedule"
    }
  ]
}
Disable Pod Identity Webhook
If you prefer to manually configure pods or use a different injection mechanism:
module "irsa" {
  # ... other configuration ...

  webhook_enabled = false
}
Then manually configure your pods:
apiVersion: v1
kind: Pod
metadata:
  name: manual-config
spec:
  serviceAccountName: my-app
  containers:
  - name: app
    image: my-app:latest
    env:
    - name: AWS_ROLE_ARN
      value: arn:aws:iam::123456789012:role/my-app-s3-access
    - name: AWS_WEB_IDENTITY_TOKEN_FILE
      value: /var/run/secrets/eks.amazonaws.com/serviceaccount/token
    - name: AWS_DEFAULT_REGION
      value: eu-west-1
    volumeMounts:
    - name: aws-iam-token
      mountPath: /var/run/secrets/eks.amazonaws.com/serviceaccount
      readOnly: true
  volumes:
  - name: aws-iam-token
    projected:
      sources:
      - serviceAccountToken:
          audience: sts.amazonaws.com
          expirationSeconds: 86400
          path: token
Security Best Practices
1. Use Narrow Trust Policies
Always scope IAM role trust policies to specific service accounts:
{
  "Condition": {
    "StringEquals": {
      "oidc-provider-url:sub": "system:serviceaccount:namespace:service-account-name",
      "oidc-provider-url:aud": "sts.amazonaws.com"
    }
  }
}
Anti-pattern: Trusting all service accounts in a namespace or cluster.
2. Implement Least Privilege IAM Policies
Grant only the minimum permissions required:
{
  "Version": "2012-10-17",
  "Statement": [
    {
      "Effect": "Allow",
      "Action": [
        "s3:GetObject"
      ],
      "Resource": "arn:aws:s3:::my-bucket/specific-prefix/*"
    }
  ]
}
3. Monitor and Audit
Enable CloudTrail to audit all AssumeRoleWithWebIdentity calls:
# Find which pods are assuming which roles
aws cloudtrail lookup-events \
  --lookup-attributes AttributeKey=EventName,AttributeValue=AssumeRoleWithWebIdentity \
  --max-results 50
4. Rotate Service Account Tokens
The module configures tokens with a 24-hour expiration:
projected:
  sources:
  - serviceAccountToken:
      audience: sts.amazonaws.com
      expirationSeconds: 86400  # 24 hours
      path: token
Kubernetes automatically rotates these tokens, and the AWS SDK handles renewal transparently.
5. Secure Your kubeconfig
The Terraform module needs read access to your cluster’s JWKS endpoint. Ensure:
- The kubeconfig used by Terraform has minimal permissions
- Consider using a dedicated service account for Terraform
- Store kubeconfig securely (encrypted backends, Vault, etc.)
Troubleshooting
Problem: “An error occurred (InvalidIdentityToken) when calling the AssumeRoleWithWebIdentity operation”
Possible causes:
-
API server issuer mismatch:
# Check your API server flag kubectl cluster-info dump | grep service-account-issuer # Should match your OIDC domain exactly # Correct: https://my-cluster-oidc.example.com # Wrong: https://my-cluster-oidc.example.com/ -
Token audience mismatch:
# Decode the token to check audience kubectl create token my-app --audience=sts.amazonaws.com --duration=1h | \ cut -d. -f2 | base64 -d | jq .aud # Should output: ["sts.amazonaws.com"] -
OIDC documents not accessible:
# Test OIDC discovery document
curl https://my-cluster-oidc.example.com/.well-known/openid-configuration

# Test JWKS
curl https://my-cluster-oidc.example.com/openid/v1/jwks
Problem: “Pod is not being mutated by the webhook”
Check webhook deployment:
kubectl get pods -n kube-system -l app.kubernetes.io/name=aws-pod-identity-webhook

# Check webhook logs
kubectl logs -n kube-system -l app.kubernetes.io/name=aws-pod-identity-webhook
Verify MutatingWebhookConfiguration:
kubectl get mutatingwebhookconfiguration pod-identity-webhook -o yaml

# Check if it's selecting your namespace
kubectl label namespace default pod-identity-webhook=enabled
Problem: “Certificate validation failed”
Check ACM certificate status:
aws acm list-certificates --region us-east-1

# Verify DNS validation records
aws route53 list-resource-record-sets --hosted-zone-id Z0123456789ABCDEF
Performance and Cost Optimization
CloudFront Price Classes
Choose the appropriate price class based on your geographic distribution:
PriceClass_All: Global (most expensive, lowest latency everywhere)PriceClass_200: North America, Europe, Asia, Middle East, AfricaPriceClass_100: North America, Europe only (cheapest, suitable for many use cases)
Cache TTL Tuning
OIDC documents change rarely (only when you rotate cluster keys), so aggressive caching is safe:
module "irsa" {
  default_cache_ttl = 86400  # 24 hours
  max_cache_ttl     = 604800 # 7 days
}
Estimated Costs
For a typical production cluster:
- S3: ~$0.05/month (storage + requests)
- CloudFront: ~$1-5/month (depends on request volume)
- Route53: $0.50/month (hosted zone)
- ACM: Free
Total: ~$2-6/month for enterprise-grade security.
Comparison: EKS vs. Self-Managed with IRSA
| Feature | EKS with IRSA | Self-Managed + This Module |
|---|---|---|
| OIDC-based authentication | ✅ | ✅ |
| Short-lived credentials | ✅ | ✅ |
| CloudTrail audit logs | ✅ | ✅ |
| Automatic token rotation | ✅ | ✅ |
| Pod Identity Webhook | ✅ | ✅ |
| Works with Talos/k3s/RKE2 | ❌ | ✅ |
| Full control over infrastructure | ❌ | ✅ |
| EKS service fees | $72/month per cluster | $0 |
| Setup complexity | Low | Medium |
Real-World Use Cases
1. Multi-Cluster Platform
Run multiple self-managed clusters (dev, staging, prod) with isolated IRSA:
module "irsa_dev" {
  source = "KamranBiglari/kubernetes-irsa/aws"

  name        = "platform-dev"
  environment = "dev"
  oidc_domain = "k8s-dev-oidc.platform.company.com"
  # ... other config ...
}

module "irsa_prod" {
  source = "KamranBiglari/kubernetes-irsa/aws"

  name        = "platform-prod"
  environment = "prod"
  oidc_domain = "k8s-prod-oidc.platform.company.com"
  # ... other config ...
}
2. Hybrid Cloud Integration
Run Kubernetes on-premises or in other clouds, but access AWS services:
# Talos cluster running in a datacenter
module "irsa_onprem" {
  source = "KamranBiglari/kubernetes-irsa/aws"

  name        = "onprem-cluster"
  oidc_domain = "k8s-onprem-oidc.company.com"

  # Pods can access S3, DynamoDB, etc. from on-premises
  # ... config ...
}
3. Cost-Optimized Edge Clusters
Deploy lightweight k3s clusters for edge computing with AWS backend:
# k3s on ARM-based edge nodes
module "irsa_edge" {
  source = "KamranBiglari/kubernetes-irsa/aws"

  name        = "edge-cluster"
  oidc_domain = "k8s-edge-oidc.company.com"

  # Minimal CloudFront price class for cost savings
  cloudfront_price_class = "PriceClass_100"
  # ... config ...
}
Migration from Long-Lived Credentials
If you’re currently using embedded credentials, here’s a safe migration path:
Phase 1: Deploy IRSA Alongside Existing Credentials
apiVersion: v1
kind: Pod
metadata:
  name: migration-pod
spec:
  serviceAccountName: my-app  # IRSA-enabled
  containers:
  - name: app
    image: my-app:latest
    env:
    # Old credentials (fallback)
    - name: AWS_ACCESS_KEY_ID
      valueFrom:
        secretKeyRef:
          name: aws-credentials
          key: access_key_id
    # IRSA will be used first if available
Phase 2: Verify IRSA is Working
# Exec into pod
kubectl exec -it migration-pod -- sh

# Check that IRSA credentials are being used
env | grep AWS

# Make test AWS API call
aws s3 ls

# Check CloudTrail to confirm AssumeRoleWithWebIdentity is being used
Phase 3: Remove Old Credentials
apiVersion: v1
kind: Pod
metadata:
  name: migration-pod
spec:
  serviceAccountName: my-app
  containers:
  - name: app
    image: my-app:latest
    # No AWS credential environment variables!
    # IRSA handles everything
Phase 4: Delete Secrets
kubectl delete secret aws-credentialsConclusion
Implementing IRSA for self-managed Kubernetes clusters transforms AWS access from a security liability into a zero-trust, auditable, and automated system.
Key Benefits Recap
✅ Security: No more long-lived credentials in your cluster ✅ Compliance: Full CloudTrail audit logs of all AWS API calls ✅ Automation: Automatic credential rotation and injection ✅ Flexibility: Works with any Kubernetes distribution ✅ Cost-Effective: Enterprise security for ~$2-6/month ✅ EKS-Compatible: Same OIDC mechanism and pod annotations
Getting Started
- Check out the module: github.com/KamranBiglari/terraform-aws-kubernetes-irsa
- Review the example: See the full working example in the repository
- Deploy in dev: Test in a non-production cluster first
- Migrate gradually: Use the phased migration approach above
What’s Next?
The module is open source and actively maintained. Future enhancements may include:
- Support for multiple OIDC providers per cluster
- Integration with external secret operators
- Enhanced monitoring and alerting capabilities
- Additional authentication mechanisms
I’m sharing this as open source to help the community bridge the gap between self-hosted flexibility and AWS security standards. If you have questions, suggestions, or encounter issues, please open an issue on GitHub or reach out!
Resources:
- GitHub Repository: terraform-aws-kubernetes-irsa
- AWS Documentation: IAM Roles for Service Accounts
- Kubernetes Documentation: Service Account Token Volume Projection
Have you implemented IRSA on your self-managed clusters? What challenges did you face? Share your experiences or reach out on LinkedIn!